Support for online Delegated Authorisers
This guide is intended to familiarise yourself with the key ESL Online Delegated Authoriser functions and responsibilities. It will show you how to invite staff to your organisation, and also how to maintain ESL user accounts for staff at your organisation.
Your role as an online Delegated Authoriser
As an ESL Delegated Authoriser, you will use ESL Online to view and maintain the ESL user accounts for your organisation and their access to Education Sector applications.
ESL Online provides a delegated authoriser with the ability to:
- send invites to your staff so they can access applications on behalf of your organisation
- maintain user details and access for your staff
- unlock accounts for your staff that have 'Locked' their account
- reset ESL passphrase for your staff
- re-enable user's disabled accounts
- generate a report with access details for your staff.
Accessing the Delegated Authoriser section of ESL can be done from ESL Self Service by clicking on the “Delegated Authoriser” button on the black bar at the very bottom of the Self Service page.
Alternatively, accessing ESL for Delegated Authorisers can be done from Here
Logging in:
Once at the login screen you will be prompted for your ESL Username and Passphrase, once entered, select “Login”.
You will be then prompted to Set Up MFA. This is mandatory for you to access the Delegated Authoriser webpage. Please see Setting up Multifactor Authentication for more information regarding setting up MFA for the first time.
If you have already set up MFA, you will be prompted for a 6-digit code. Please locate this code from your chosen authenticator application.
After successfully logging into ESL for Delegated Authorisers you will be taken to the “Search User” landing page.
Please Note: To log into ESL for Delegated Authorisers you must have the Delegated Authoriser role in ESL and have completed the Delegated Authoriser Training.
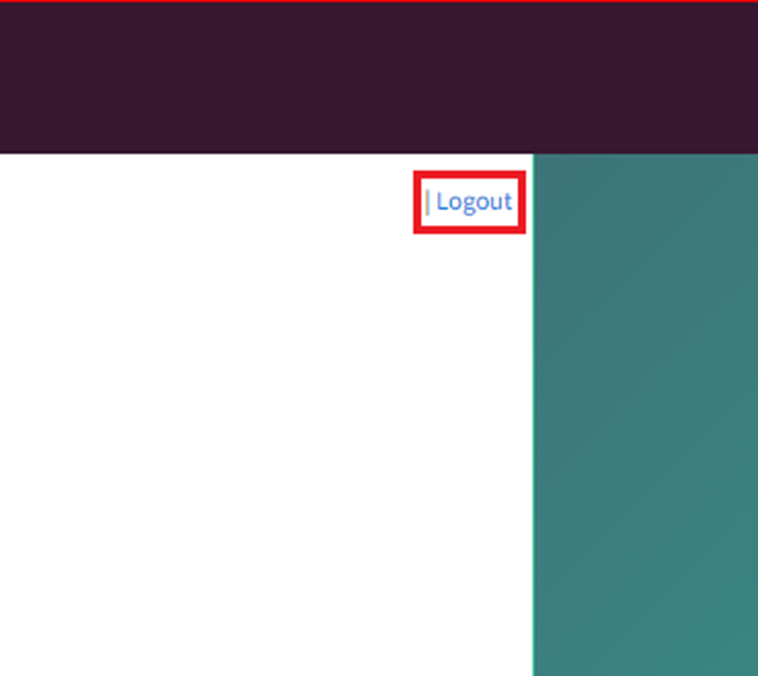
The Delegated Authorisers Landing page should display your name next to the 'Logout' button on the top right of the screen. (If someone else's name is displayed please advise the Education Service Desk straight away.)
A list of your staff that have an ESL user account is displayed to the right of "Search user". By default, up to 20 users can be shown on the screen at one time. Use ‘Previous’/’Next’ for more users. User details displayed are name, email address, username, and preferred name.
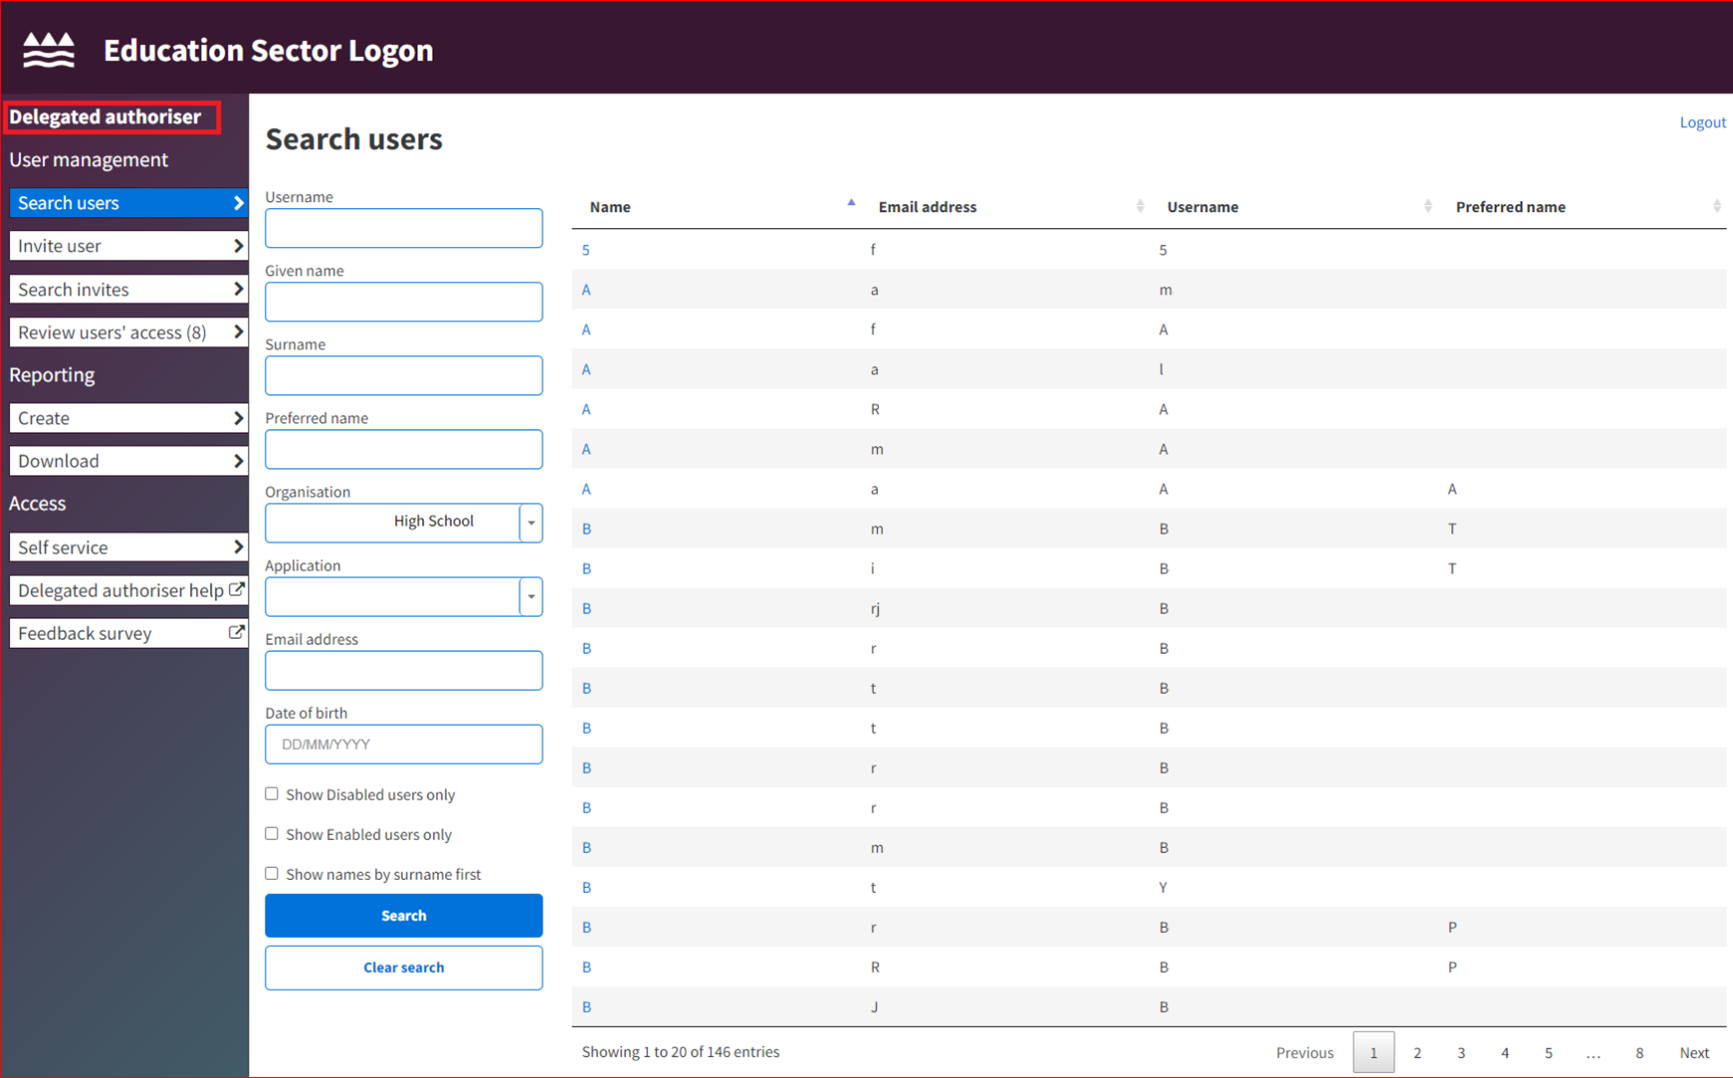
Please note: This section to the right will be empty if your organisation has no ESL users.
This landing page's main function is to search for users within your organisation.
You can search for one or more users by using the various searchable fields. You can choose a user by selecting their name (shown as hyperlinked in blue) to view their account details. See details below about how to search User accounts.
The left hand menu allows a Delegated Authoriser to carry out to additional user management functions such as invite user, search invites and run a report.
You can also switch between Delegated Authoriser access and Self-Service access. Self Service access allows you to view and manage some of your own ESL user account details. See instructions below about these options.
Please note: if you are a Delegated Authoriser for more than one organisation you must select the organisation you are wanting to administer from the Organisation field on the Search Users screen.
You can find a user at your organisation by performing a search on the ‘Search users’ page.
Note: This is the same page as the Delegated Authoriser landing page (above).
Select the ‘Search users' function from the left hand navigation menu.
Enter search criteria and then press the ‘Search’ button.
Search user criteria available are:
- Username
- Given name
- Surname
- Preferred Name
- Organisation
- Application
- Email address or,
- Date of Birth
- Wildcards may be used – see explanation further down
You may also choose to filter the selection to:
- Show only enabled (active) users
- Show only disabled (inactive) users
- Sort users’ names by surname first then given name
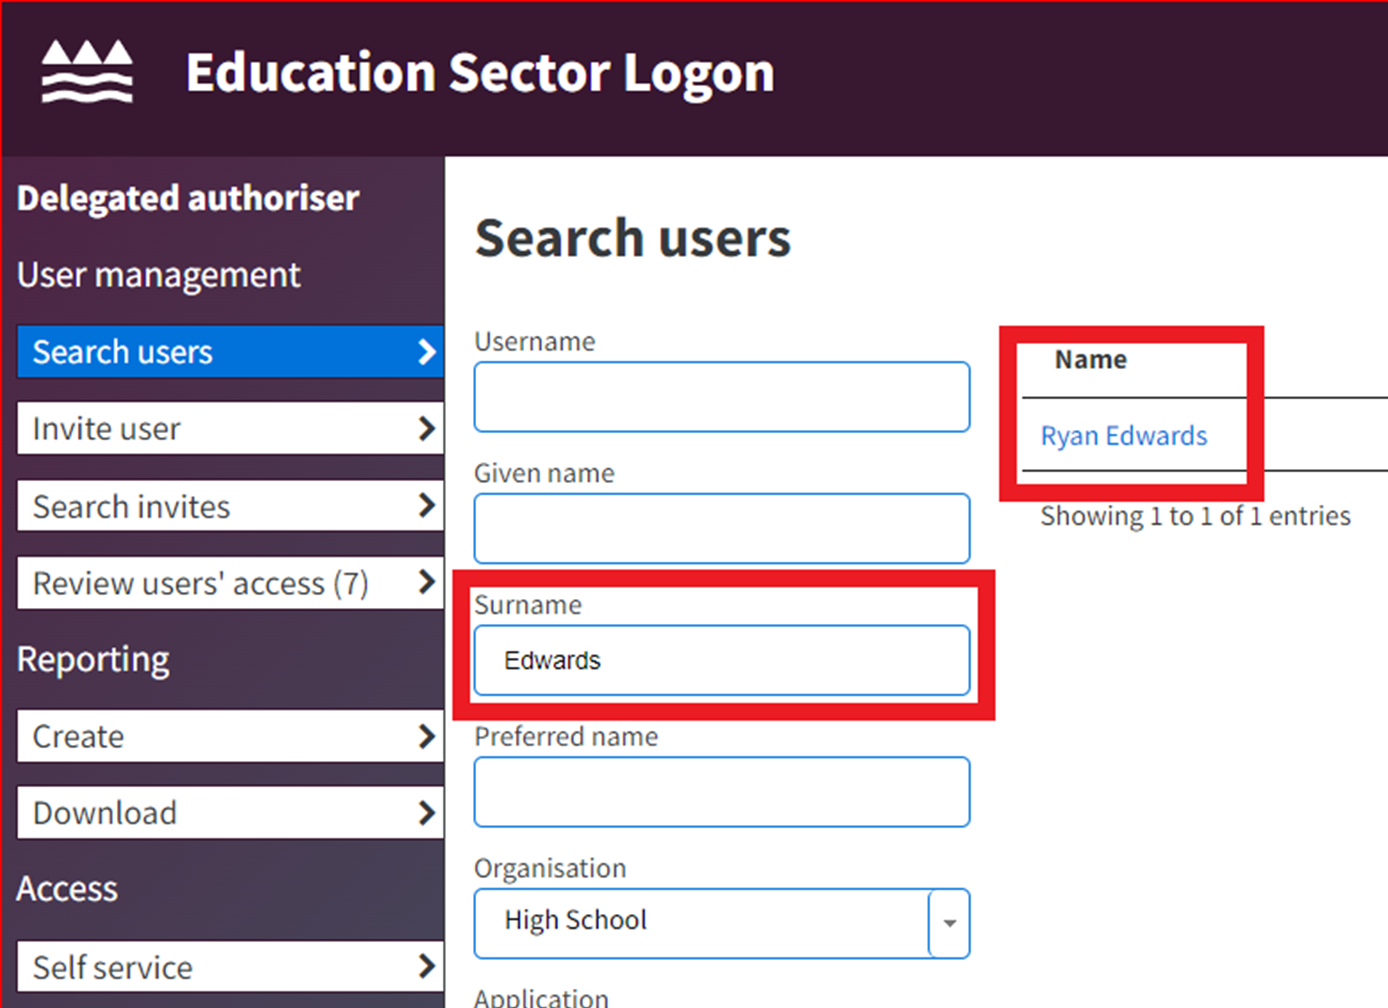
The default search below shows users’ name are sorted by given name and then surname:
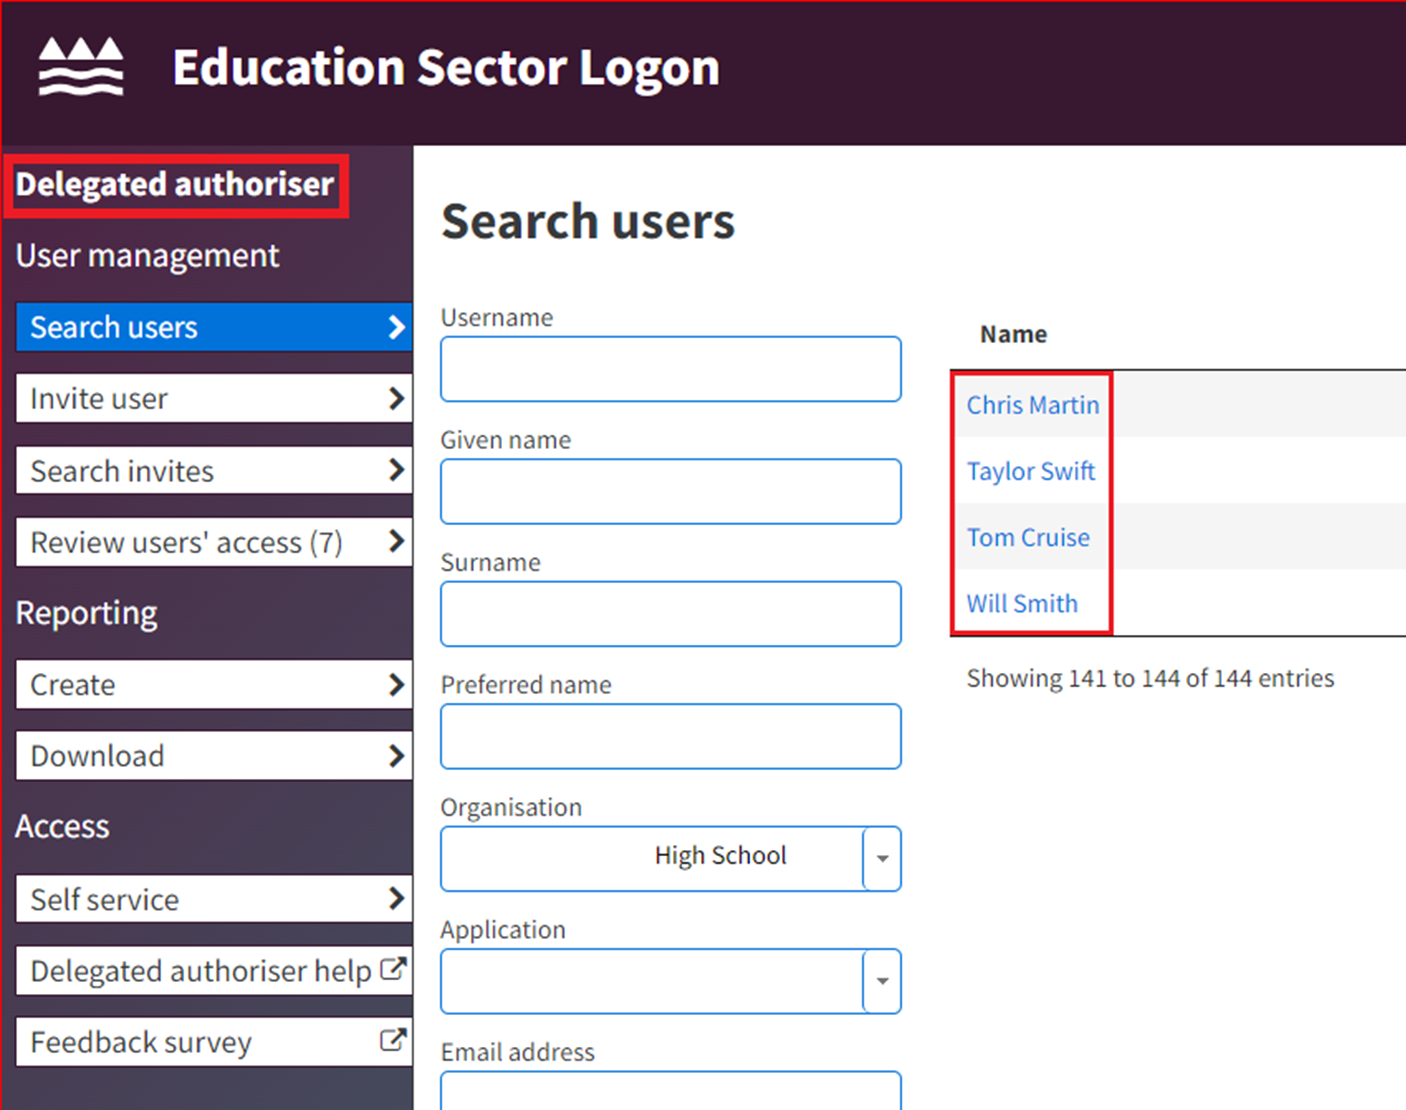
This screen shows the sort by surname and then given name when you choose the ‘Show names by surname field’ checkbox.
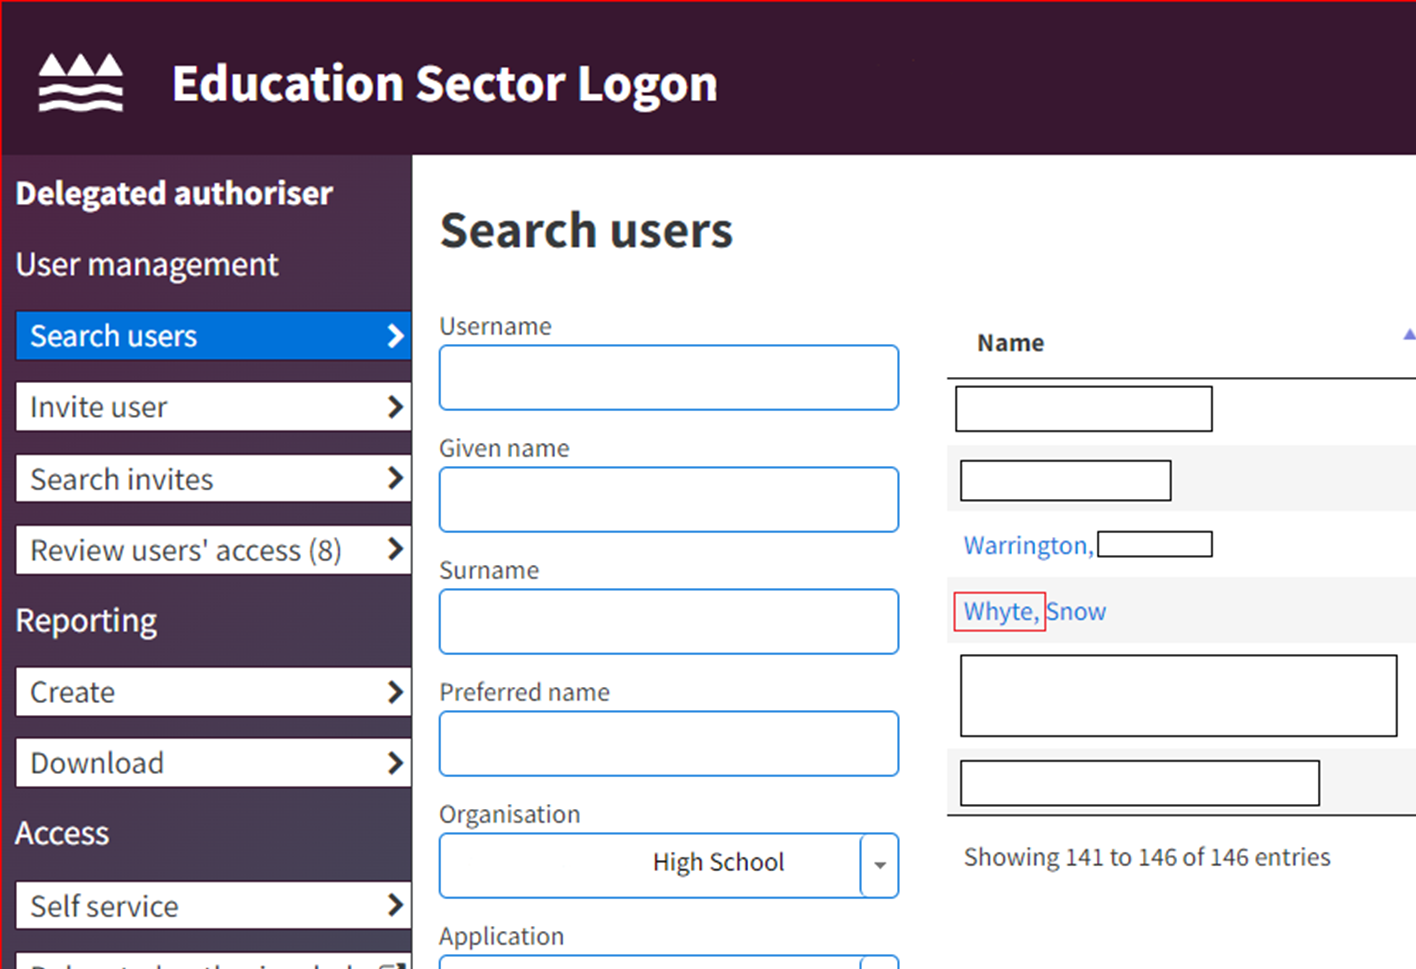
In the search results, the Name field contains a link for each user. Click on the link for the user and the details screen will be displayed for that user.
Common ways to search for users are via an Exact search or a Wildcard search. Examples of these search types are provided below.
Exact search |
The search will return user details that are an exact match on the criteria that you enter.
For example: if your search criteria is Edwards (Surname field), then all users with a last name of Edwards will be returned.
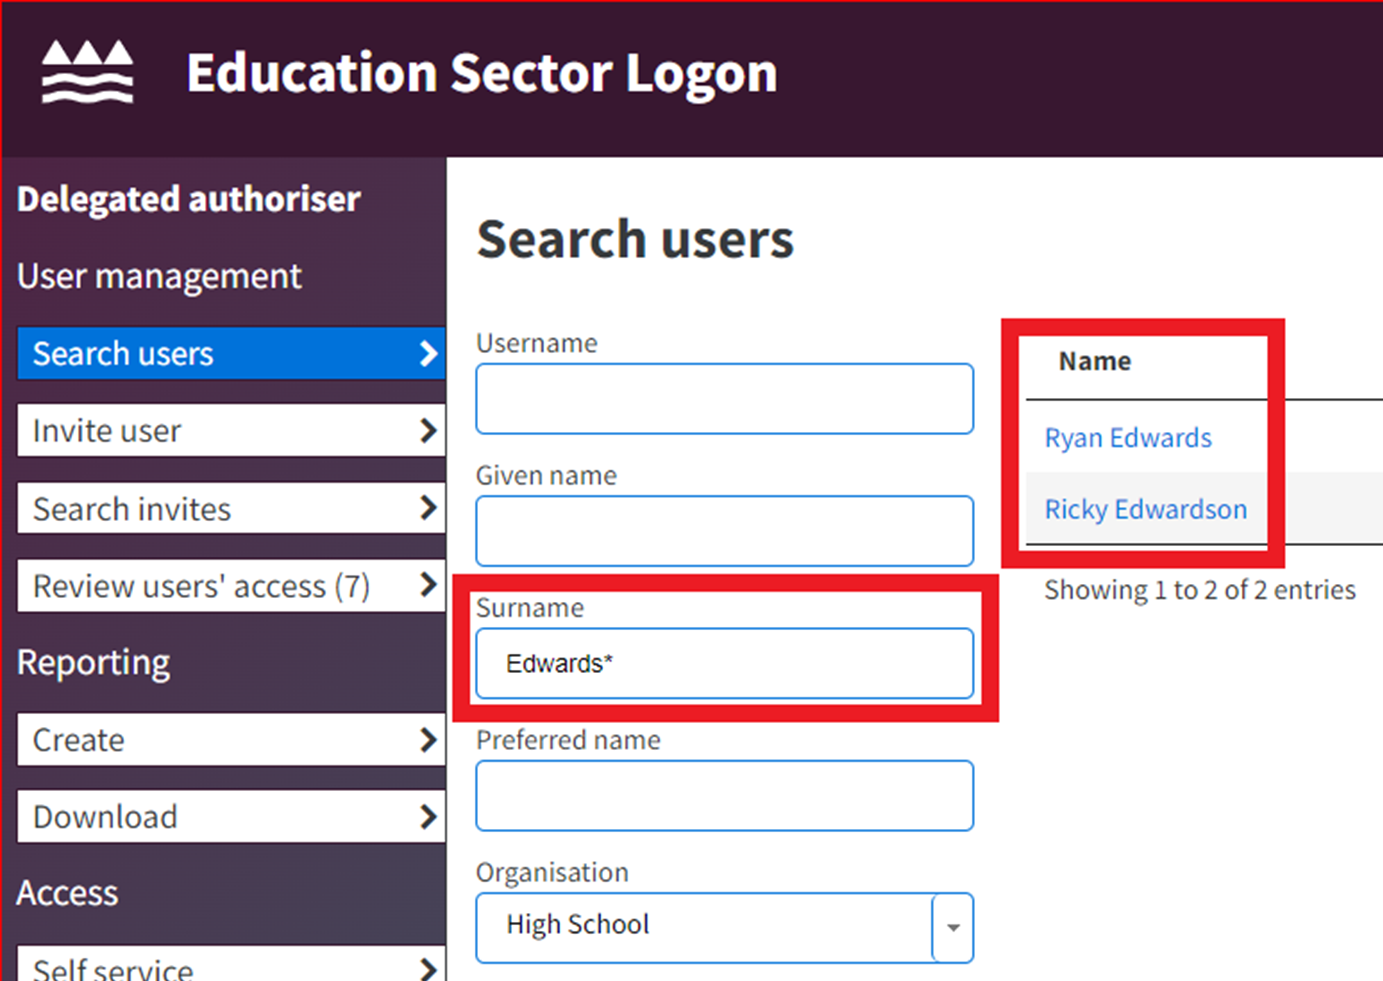
Wildcard search |
Wildcards take the place of one or more characters in a search term. A question mark (?) is used for single character searching. An asterisk (*) is used for multiple character searching. You can perform a wildcard search to return a larger group of users.
For example: if your search criteria is Edwards* (surname field), then all users with a last name that starts Edwards will be returned (i.e. Edwards will be returned as well as Edwardson).
New staff at your organisation that require ESL user access to Education Sector Applications at your organisation must be invited. This applies even if the Staff Member has an existing ESL account, as the invite allows them to connect their existing account with your organisation.
An invitation is not an ESL account. It is the mechanism for connecting an ESL account to the DA’s organisation. The person then has the opportunity to either create a new ESL account or connect their existing ESL account. It is recommended to link the ESL invite to an existing ESL account as it is easier for someone to manage and remember one account. Most ESL applications work using a single account.
Inviting a user
Select the ‘Invite user’ option from the left-hand menu and you will see the below screen.

Enter the user's personal details to exactly match their Evidence of Identity documents. Use the preferred name field to add a name someone generally uses if it is different from their given name in the EOI documentation. The fields with a red asterisk are mandatory (shown above with a green star).
Organisation and Roles
After entering the staff members details, there is a section for the delegated authoriser to allocate application access roles.
Here is where you will select the user’s Standard roles for the organisation that are necessary for them to carry out their responsibilities. Clicking on the name of the applications will expand it to show the user roles available. By giving them a role, you are enabling access to that application.
This screen shows your Organisation Name and a list of typically available applications.


If you do not select any roles when sending the invite, you will receive a dialogue box advising that there are no roles selected.

You may proceed with the invite if you are certain that the user doesn’t require any roles (i.e., access to any applications).
Generally, you should select the ‘Cancel’ button to go back to the invite user screen to select the relevant role/s for the staff member before choosing the invite button to proceed.
Please Note: There may also be roles that a user might need that are not showing to a DA. The reason these roles are unavailable for a DA to give is the access provisioning must be carried out by the technical support teams for the application. There will be access request forms available for these application roles, many of which can be found here.
Another note to keep in mind is that different organisations may have different roles available to them depending on the organisation type.
Email address requirements
Generic Email addresses:
The ESL system prefers that a ‘generic email’ address is not used as the access to the email address may be shared with multiple people which is a security risk.
A generic email address is an email that might look like ‘office@...’ or ‘admin@...’.
When a generic email address is used for an ESL account invite a dialogue box will appear informing you of this.

Unless you are sure the email address is only being used by the intended staff member you can proceed by selecting “Invite”. If the email is being used by more than one person, please select “Cancel” and request an email address from the staff member that only they can access.
Email address already in use:
The ESL system will also warn you when sending an invite if the email address entered is already associated to an ESL account. A dialogue box will appear advising you of this.

If you are certain this is the intended staff members email address, please select “Invite”. The user may already have an ESL account with this address, which they should link to this invite.
If this is not the intended staff members email address or a generic email address (which may be associated with a previous staff members account) select “Cancel” and request another email address only the intended staff member can access. If you select “Invite” for a generic email address already in use on another members ESL account, the user will be prompted to enter a different email address when accepting the invite.
Sending the Invite
After entering the staff members details and selecting their roles, at the bottom of the page there will be an “Invite” button, select this button to send the invite.
An email invitation will be sent to the user to complete the process and the below message will display in the top right corner of your page.

Note: The invite will expire after 14 days if the user does not complete the invite process. If this happens, you can resend the invite. Please see the heading “How to resend an Invite” for further instructions.
Before you send staff an email invite, you need to confirm that you have sighted their Evidence of Identity documents. You can read more about EOI requirements at:
Some application roles are set to Education Service Desk provisioned only. The checkbox is disabled. For Education Service Desk to add this role to the user, please download and complete an appropriate form (details below). You can find the forms here How to get an Education Sector Logon | Applications & Online Systems or use the link in ESL, see example below.

Education Service Desk Provisioned only - ESL forms |
| User cohort | Application | ESL Form |
|---|---|---|
| Early Childhood Users | Early Learning information (ELI) | ESL 21 Form |
| Secure Data Portal | ESL 39 Form | |
| School Users | Attendance Service Application (ASA) | ESL 140 Form |
| Tertiary Users | Attendance Service Application (ASA) | ESL 140 Form |
| NZQA Extranet | ESL 120 Form |
Follow the steps below to update a user’s access to an ESL application.
Steps on updating access
- Log in to ESL Delegated Authoriser
- Use the search users screen to find the user who needs their access updated. Click on their name to view their account details.
- From the User account details screen, select Edit roles and organisations.

- From Edit roles and organisations, select the application you want to update for a user.
- Check the relevant checkbox to update their access.

- Click update at the bottom of the page to confirm the updated role access.
- For their permissions to be updated, the user must log out of ESL, restart their internet browser, and then log in to ESL.
Important notes
- The ESL user’s evidence of identity (EOI) date must be valid to add permissions to their ESL account. An invalid EOI will display as blank or as a default (01/01/1900).
- Some access roles need approval requiring Education Service Desk intervention (including Helios, ENROL and Ngā Kete). All other role changes you make in ESL online are available to your users immediately.
- The education sector applications available to users will vary depending on their organisation type.
- Please note, it is the ESL delegated authoriser’s responsibility that all employees only have access to the ESL permissions required for their role.
For further assistance with your ESL, email service.desk@education.govt.nz
or phone 0800 422 599.
If a user’s invite has 'timed out' (invites expire after 14 days) before the user completed the invite process, or the invite was sent to an incorrect email address, then you can resend the invite.
- Select the "Search invites' function from the left hand navigation menu.
Search for the user’s invite by entering relevant search information, then select ‘Search’. In the search results the Name field contains a link for each user. Select the link for the user you want, then the invite details screen for that user will show.
Note: the search invite function has a default setting to find pending and timed out invites (see checkboxes). You may change these to suit your search.
When you have the search results the Name field contains a link for each user, when clicking the link for the user you want it will take you to the invite details screen for that user. From the invite details screen, click on ‘resend invite’.
Check and – if required – update the email address before you resend the invite.
You can ‘Cancel invite…’ to delete the invitation. Use this if details have been entered incorrectly, multiple invites have been sent or for any other reason the invite is no longer needed.
The invite will stay in the system for 30 days.
A user can edit their own contact details (Preferred name, email address or phone number) by using ESL Self Service.
Any changes to a users personal details (Given names, Surname, Date of Birth or Gender) must be done by a DA or the Education Service Desk.
Any changes to identity details requires a new Evidence of Identity check be completed before the user can be updated. Enter the user's personal details to exactly match their Evidence of Identity documents. Use the preferred name field to add a name someone generally uses if it is different from their given name in the EOI documentation.
Following the ‘Search Users’ instructions, find and select the user account for update.

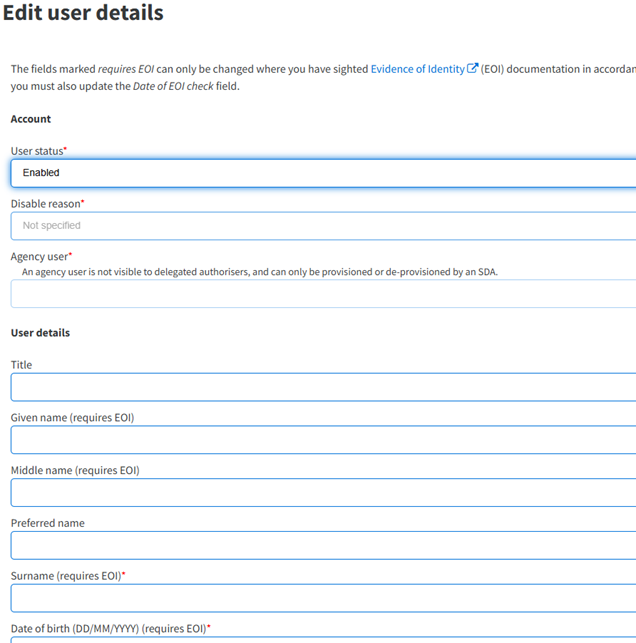
You can select ‘Edit user details’ from either of the places indicated above. This will display the below screen where you can update the user’s details.
Change any information you deem necessary and select ‘Update’. This message will show in the top right corner of your page. The user will receive an automated email from ESL confirming that their details have been updated, the email will only confirm that there has been an update not the specifics of what has been updated.

This option can only be used to re-enable an account that has an account status of disabled. This is useful to use when the user's account has been disabled (by inactivity or by the Education Service Desk).
Since the update last August 2023, Delegated Authoriser's now have the functionality to enable disabled accounts attached to their organisation in ESL under certain conditions:
- If the user account has been disabled for one of the following reasons: “Administrator Error”, “Employment ceased”, “User disabled due to inactivity”, or “Migrated as disabled”.
A Delegated Authoriser will need to contact the Education Service Desk if an ESL account is disabled due to the following conditions:
- “Deceased”, “Duplicate account”, “Inappropriate conduct”, “User profile/transaction question incorrectly answered”, “Username in non-legacy format”.
- If the account is not attached to the delegated authorisers organisation, the account holder will need to contact the Service Desk themselves.
Identifying a disabled account:
A disabled account will have a blue general prohibition icon next to the user’s name in ESL

After selecting the user’s name, in the User Details page you will see the reason the account has been disabled.

Re-enabling
To re-enable the account, select “Edit user details” either from the left-hand sidebar or from the option shown above.
Then select the “User Status” drop down box, select “Enabled”.

Make sure to select “Update” at the bottom of the page to confirm the account status change.
After selecting “Update” you will see a dialogue box prompting you to review the user’s access.

A pop-up will advise you that the user's account has been updated.

You can also review the User Details section to ensure your changes have been saved.

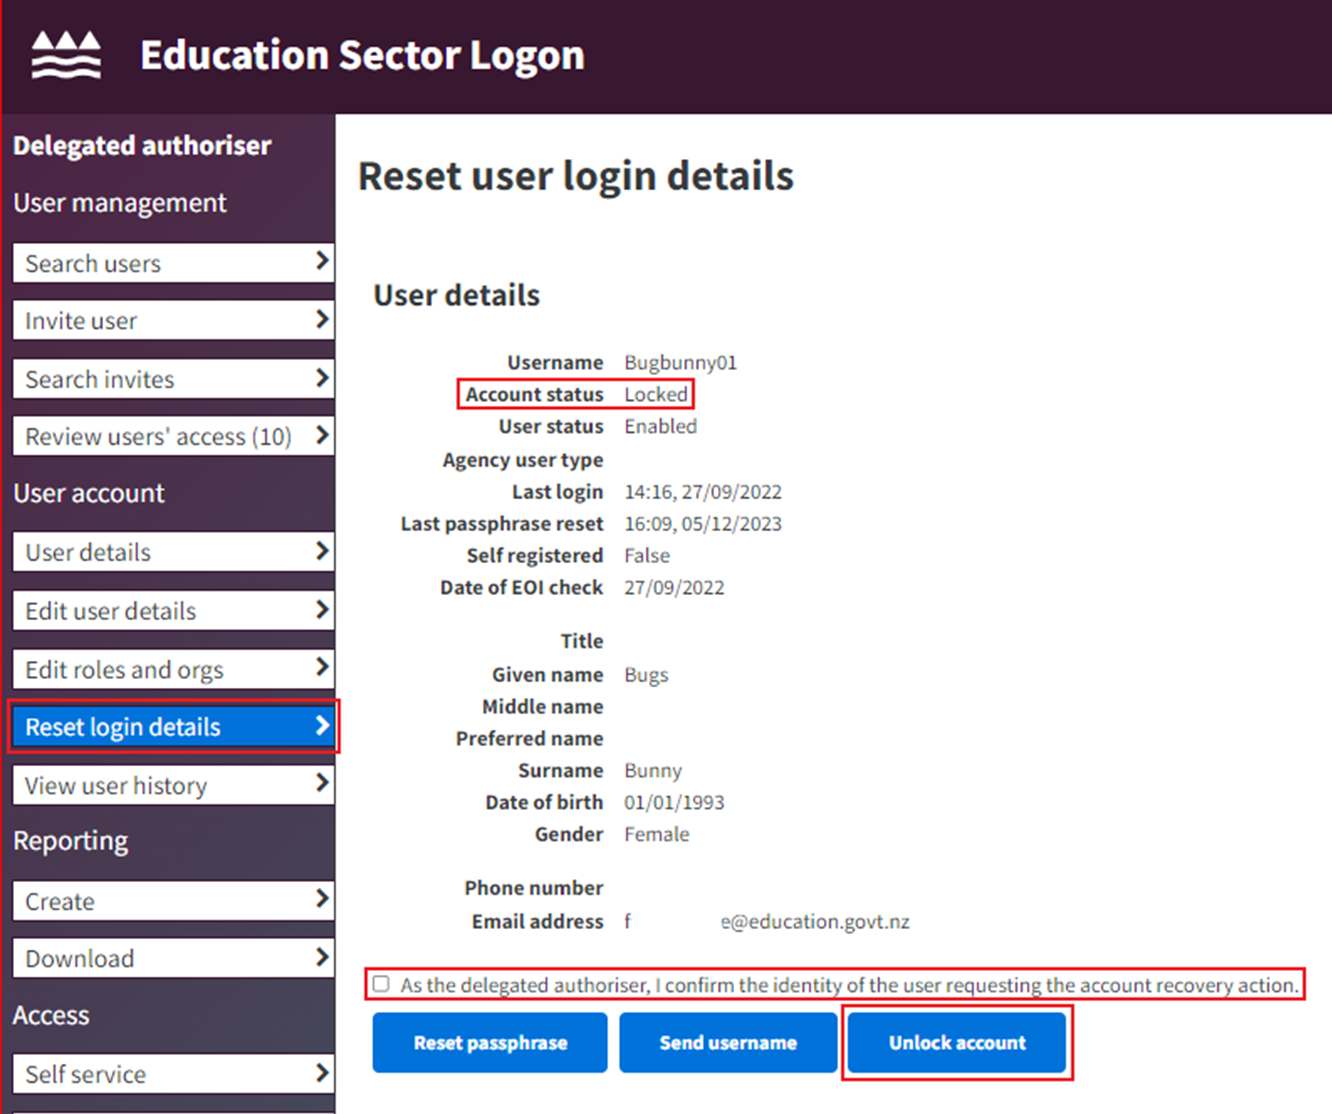
Use the ‘Reset login details’ function, if a user has forgotten their username or passphrase, or they are locked out of their ESL user account. Once you have searched and selected a user account this function will appear in the menu on the left, select the ‘Reset login details’ option.

As the Delegated Authoriser, you must confirm the identity of the user requesting any of the following three account recovery actions;
Reset passphrase |
Using this function will email a one-time passphrase to the user. This one-time passphrase will expire after 6 hours.
Note:
- Once you have confirmed the identity of the staff member who requires one of the three account recovery actions please select the radio box confirming that As the delegated authoriser, I confirm the identity of the user requesting the account recovery action.
- The user needs to login to ESL Self Service and use this one-time passphrase with their username to complete the passphrase reset process. This must be done before the one-time passphrase expires, the email advises the user of the expiry date and time.
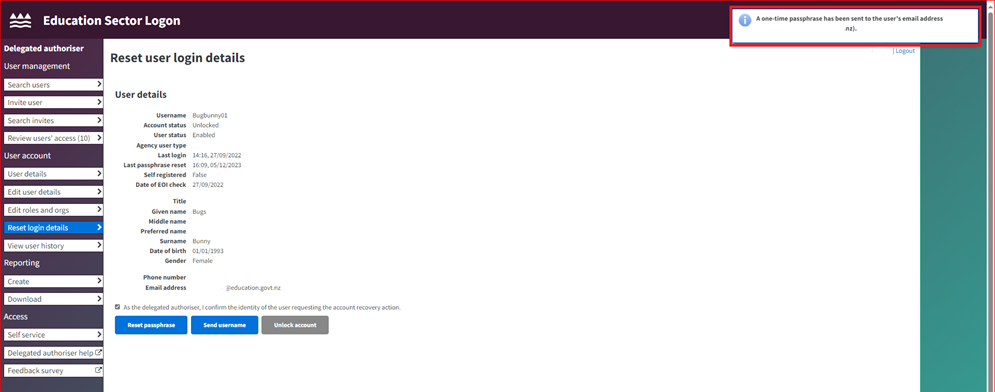


Send username |
Using this function will send the username to the user's email address from the user details section.

Unlock account |
This option can only be used to unlock an account that has an account status of Locked. This is useful to use when the user has been locked out of their account (by an incorrect passphrase being used too many times), but they can remember what their passphrase is.

Notes:
- When a user has entered their security questions incorrectly, ESL will lock out this feature. The user will need to request a passphrase reset. If they tell you that they are unsure of the answers to their Security Questions please advise them that once they have reset their passphrase the Self-Service page will display. On this page there will be an option for them to view the questions and change them.
- Check that a user’s account is unlocked before resetting their passphrase. They will not be able to update their passphrase if the account is locked.
- Check that the user is not using an expired reset passphrase login link (this only lasts 6 hours).
- Allow enough time for e-mail delivery before resending a reset passphrase link. The user must use the last passphrase reset link sent, as this is the only valid one.
To log in to ESL as a Delegated Authoriser, you must first complete the following training:
- ESL Delegated Authoriser Training Module
- ESL Security Awareness and Privacy Best Practice Guide
You will be contacted by our Training Services team to book this training. Within 3 working days of completing the module you will be given the Delegated Authoriser Access.
To access and complete this training login to the Education Learning Management System - training.education.govt.nz
For additional support using the Education Learning Management System, please contact the Training Services team.
Phone: +64 44630928
A Delegated Authoriser functionality is pending status means your application has been processed, however you may not have completed the two training modules in our Learning Management System - https://training.education.govt.nz/ .
There are two training modules:
- ESL Delegated Authoriser training and
- ESL Security Awareness and Privacy Best Practice Guide.
Once you have completed both training modules it can take up to 3 working days before you will be given Online Delegated Authoriser access. If after this time, you have not received an email stating you are now an Online Delegated Authoriser, please contact Education Service Desk on 0800 422 599 (NZ) or email Service.Desk@education.govt.nz
Review users’ access feature facilitates the review of all users and their roles in your organisation. It enables you to periodically confirm or reject their ongoing access in this screen. As a Delegated Authoriser you will be reminded to review each of your users’ roles after they have been assigned for 18 months, and subsequently again whenever 18 months pass since the last review.


Navigating to review users’ access
There are two ways to navigate to Review users’ access:
- By clicking the link under User Management.
- If you have roles ready for review, you will see a pop-up message when you log in. The message contains a link to Review users’ access:

The total number of reviews pending will also be displayed on the menu link:

What you need to do
If you are a Delegated Authoriser at more than one organisation, select the organisation you want to review from the drop-down menu.
On the screen, there will be a line representing each user-role relationship. E.g if a user has 5 different roles, you will see 5 entries for them on the screen which require review:

Each line on the screen has two decision buttons: ‘Confirm’ and ‘Reject’. By clicking ‘Confirm’ you are verifying that the user still requires that role. If you click ‘Reject’, the role will be removed from that user as it is no longer required.
Once you ‘Confirm’ the role for a user, it will disappear from the list. You will see a confirmation message on top of the screen:

If you reject a role, you will be presented with a message informing you the role will be removed:

You can sort on any of the rows by clicking on the top of the row.
You can search within any of the rows by typing in the search boxes at the bottom of the list.
If a user is leaving your organisation then you will need to remove your organisation from the user’s ESL account to they cannot access applications on behalf of your organisation.
Please note: this action removes the user’s connection to your organisation, it does not remove their ESL account
Removing your organisation and access from a user
Search for the Users account and select ‘Edit roles and organisations’.


After selecting an organisation, select the red option ‘Remove user from organisation’, when the pop-up appears select ‘Confirm’.


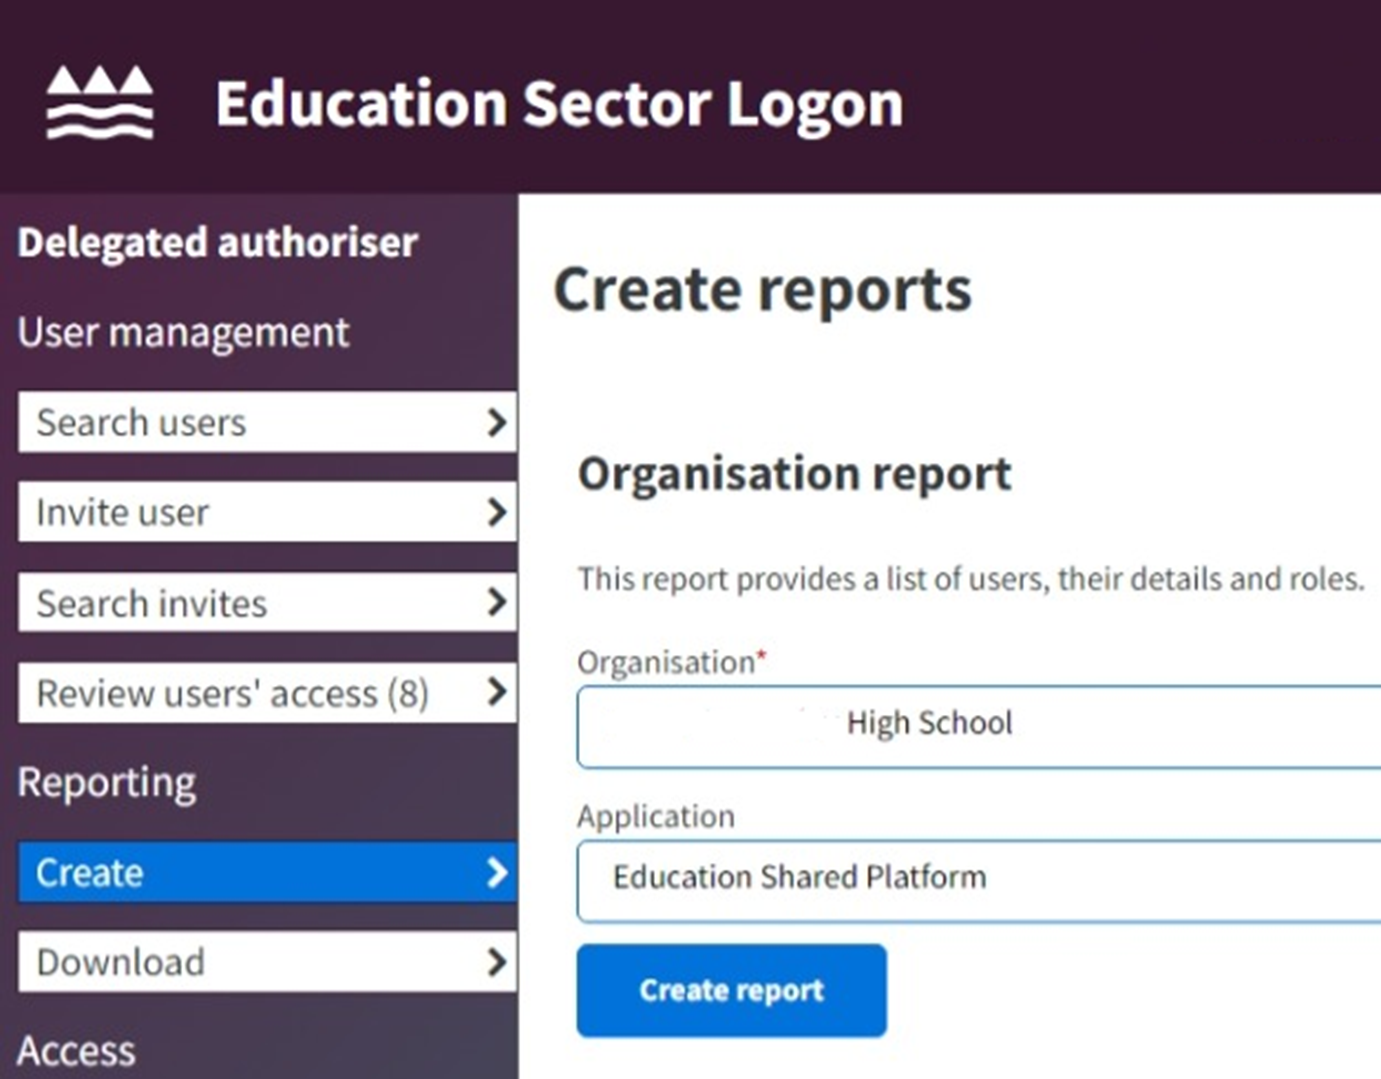
You can use the Reports functionality to get a list of all ESL user accounts at your organisation and their associated applications and access. Select the ‘Create’ link under Reporting in the left-hand side menu, the below will be displayed.
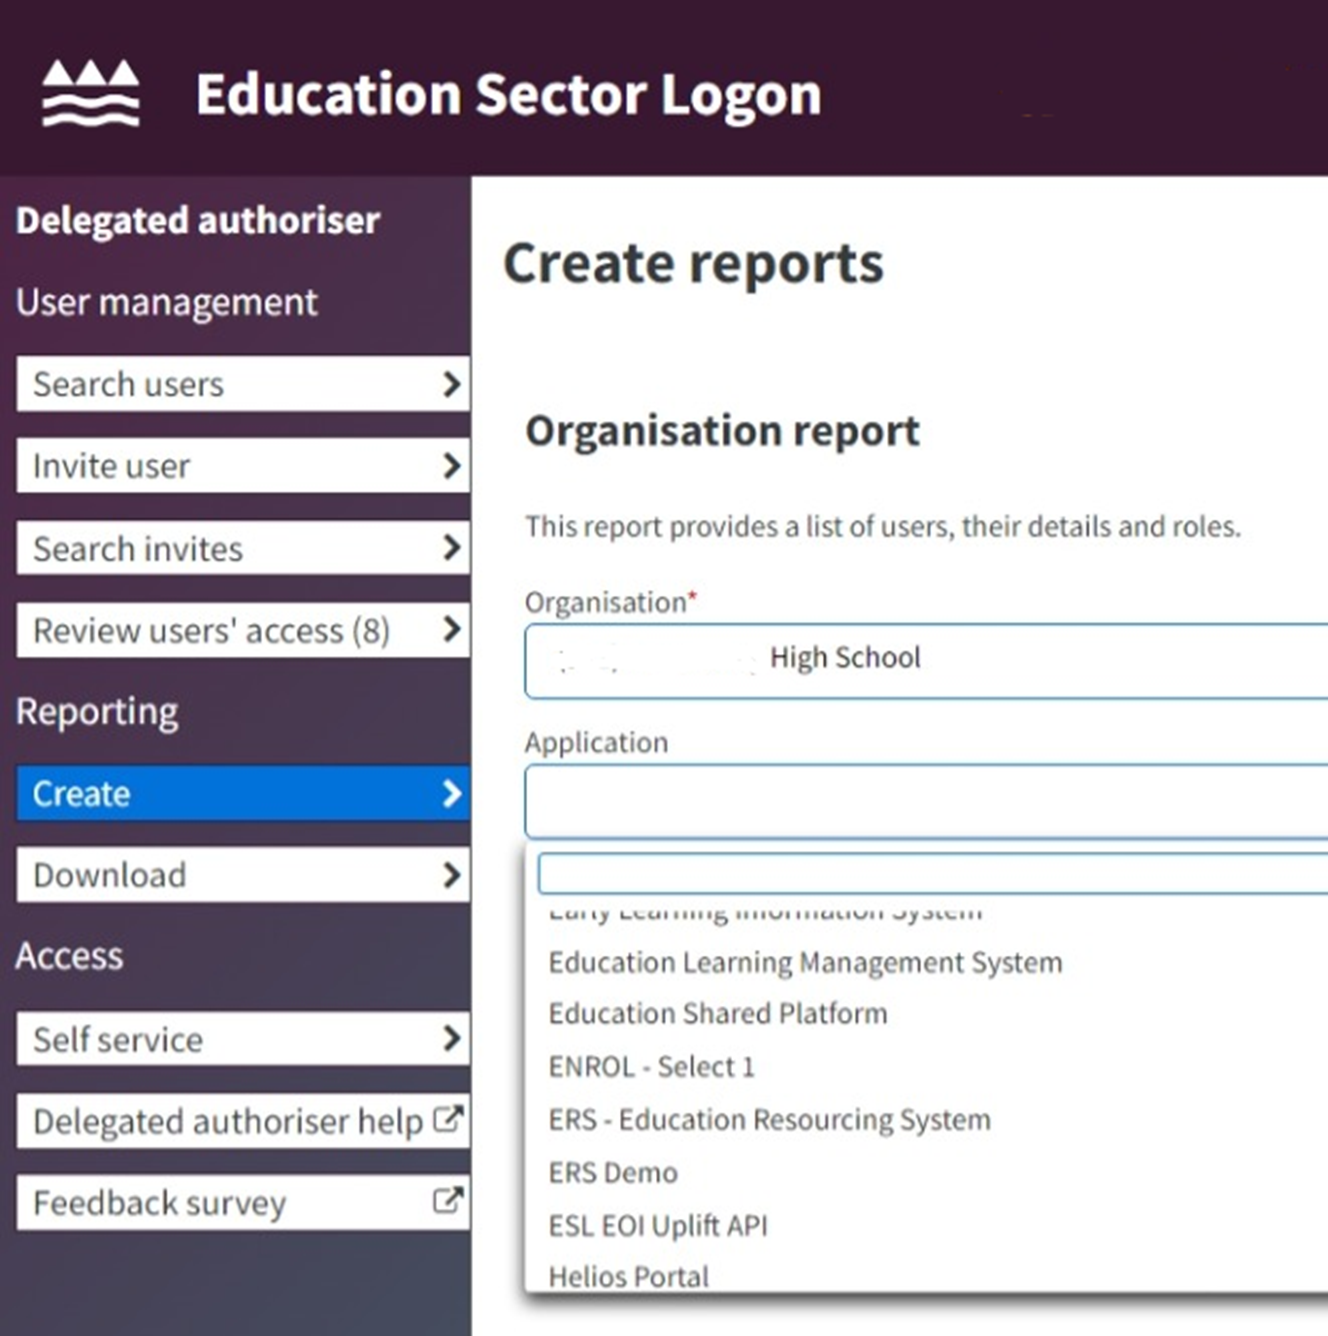
A report can be created to:
- generate a list of all of your ESL users and their access for all Education Sector applications (you can do this by leaving the application field blank)
- generate a list of your ESL users for a specific Education Sector application (you can do this by selecting an application from the application field)
Once you ‘Create report’ it may take a few moments, or even up to a few minutes to generate the report. The below message will be displayed in the top right corner when you generate the report.
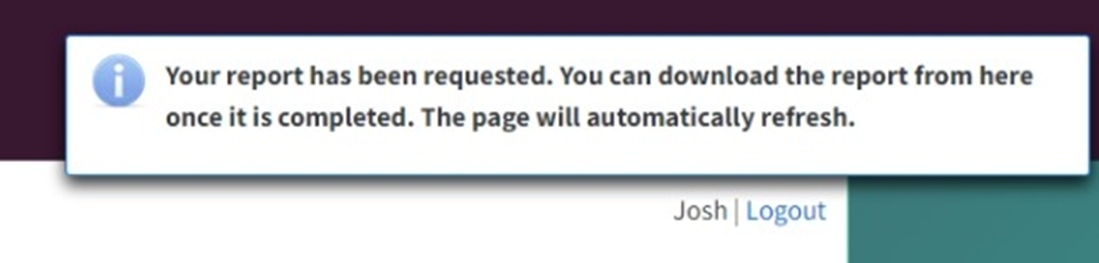
Once the report is generated the page will refresh and the status will show as COMPLETED you can download the report by selecting the hyperlinked Report name, see below.

A message indicating a successful download will show at the top of the screen (in the Microsoft Edge Browser).

The report will be generated as a Microsoft Excel download in CSV format.

Once you have finished using ESL Online always use the logout link in the top right corner to terminate your session. This is a security requirement as an ESL user.